
Essential site cut safety tips for Auckland building projects
- Jay Price
- 1 day ago
- 7 min read


TL;DR:
Proper geotechnical assessments are essential to prevent ground failure and ensure site stability.
Active utility verification and physical exposure reduce the risk of dangerous utility strikes.
Continuous monitoring and safety protections are crucial, especially during weather variations and deeper excavations.
Site cuts are one of the most technically demanding phases of any Auckland development, and the margin for error is razor thin. Ground collapses, utility strikes and non-compliant batters can halt a project for weeks, trigger WorkSafe investigations and drive costs through the roof. This article is written specifically for property developers and builders who want to move fast without cutting corners on safety. You’ll learn the four safety pillars that experienced civil contractors rely on: geotechnical assessments, utility checks, excavation protections, and ongoing monitoring.
Table of Contents
Key Takeaways
Point | Details |
Conduct geotechnical tests | Always assess soil conditions before any cutting to spot hidden hazards and design safe slopes. |
Locate all underground services | Never start a site cut without marking utilities to avoid strikes, delays and extra costs. |
Use protective systems for deep cuts | Install shoring, shielding or benching for excavations over 1.2m to protect workers and remain compliant. |
Check and maintain slopes continually | Inspect for cracks, remove loose material and monitor after heavy rain to ensure ongoing site safety. |
Start with geotechnical assessments
Before a single bucket of earth is moved, you need to understand what you’re dealing with underground. Auckland’s geology is notoriously varied. You can move from firm volcanic basalt to soft, water-saturated clay within the same site. That variability is exactly why evaluating soil stability before work begins is non-negotiable.
A geotechnical assessment gives you a ground profile that identifies soil types, groundwater depth, bearing capacity, and potential hazards like peat layers or filled ground. From that profile, your engineers can design safe slope angles and batter ratios that won’t collapse under load or after rain.
Key outputs from a thorough geotechnical report include:
Soil classification across the full cut depth
Groundwater levels and seasonal fluctuation risk
Recommended batter angles for stable cut faces
Identification of any filled or unstable ground that needs special treatment
Foundation bearing capacity for structures near the cut
Skipping this step to save a few thousand dollars is a false economy. A geotechnical assessment that costs $3,000 to $8,000 can prevent a slope failure that costs ten times that in remediation, delays and potential liability. Controlling ground instability in excavations starts with knowing what you’re cutting into.
Pro Tip: Ask your geotechnical engineer to flag any areas of transition between soil types on the plan. These zones are where unexpected failures most often occur during the cut.
Reviewing the site cut planning steps before you engage a geotechnical firm will help you brief them properly and get a more useful report.
Utility checks: Call before you cut
Soil risks aside, another hazard is buried below the surface: underground utilities. Striking a live power cable, a gas main or a pressurised water main during a site cut is not just expensive. It is genuinely life-threatening, and it can shut a job down for days while network operators make emergency repairs.
The process for avoiding utility strikes follows a clear sequence:
Contact Dial Before You Dig (the New Zealand equivalent service) to request utility plans for the site.
Review all utility records provided, including water, gas, power, telecom and stormwater.
Mark up utility routes on the ground using standard locating equipment before excavation begins.
Physically expose (pot hole or hand dig) any utilities that fall within the planned cut zone to confirm their exact depth and alignment.
Brief all machine operators on the confirmed utility locations before they start work.
Utility strikes during excavation remain one of the most preventable causes of project disruption and serious injury. Preventing utility strikes requires active verification, not just a phone call.
Utility records are not always accurate. Pipes and cables get redirected over decades of upgrades without full documentation. Physically locating and exposing utilities is the only way to be certain.
Pro Tip: Build a site-specific utility map before excavation starts and circulate it to every operator and supervisor on site. Update it immediately if any unexpected services are discovered during the cut.
Reviewing site preparation essentials will give you a broader picture of the pre-excavation steps that need to happen in parallel.
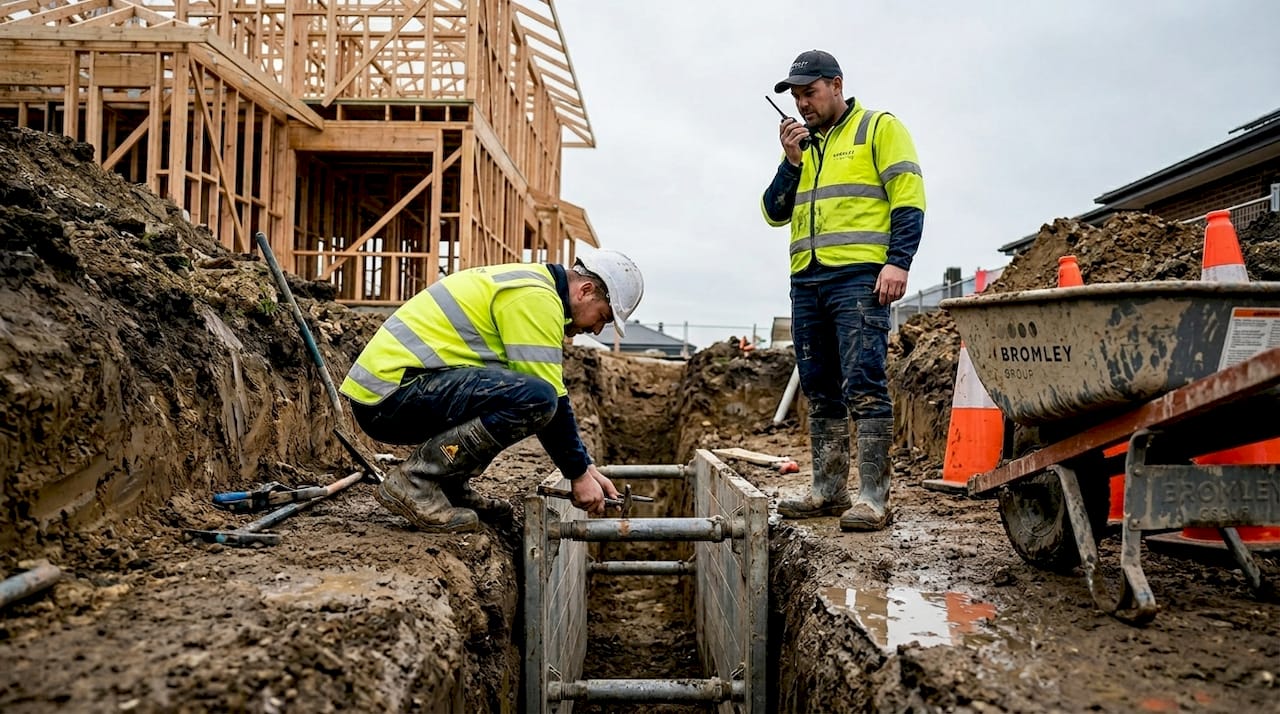
Safe excavation techniques and protections
Once you know what’s underfoot, attention turns to excavation techniques that keep workers and sites truly safe. The key threshold to know is 1.2 metres. Any excavation deeper than 1.2 metres requires a formal protection system under New Zealand health and safety regulations.
Protection method | Best used when | Key advantage |
Shoring | Confined sites, near structures | Supports trench walls without battering back |
Benching | Open sites with cohesive soil | Uses stepped cuts to reduce face height |
Shielding (trench box) | Loose or granular soils | Protects workers inside the trench directly |
Trenching and excavation compliance standards require daily inspections by a competent person, defined as someone with the training and experience to identify hazards and know when to call a halt.
Beyond the protection system, safe excavation also means:
Establishing exclusion zones around all heavy plant and machinery to prevent workers being struck
Keeping spoil heaps at least 600mm back from the edge of any cut face
Never allowing workers inside an unprotected excavation deeper than 1.2 metres
Securing the preparation workflow so that each step is signed off before the next begins
The competent person inspection is not a formality. It is the daily checkpoint that catches the early warning signs of face movement before they become a collapse.
Ongoing monitoring, scaling and weather watch
Even with protections in place, safe sites demand ongoing attention and adaptive monitoring. A site cut is not a set-and-forget operation. Ground conditions change, especially in Auckland where rainfall events can saturate slopes and dramatically reduce soil strength overnight.
Key daily monitoring tasks:
Inspect cut faces for new cracks, bulging or any sign of movement
Check drainage around the site perimeter to ensure water is not pooling against cut faces
Scale loose material from exposed slopes using appropriate tools before workers enter the zone below
Review any structural indicators like retaining wall ties or shoring props for signs of stress
Condition | Action required |
Surface cracks near cut edge | Stop work, reassess batter design immediately |
Heavy rainfall event | Full inspection before resuming excavation |
Loose material visible on slope | Scale and remove before personnel enter zone |
Seepage or water emerging from face | Engage geotechnical engineer for reassessment |
Scaling loose material from slopes after excavation and monitoring for cracks are basic but critical practices that are often deprioritised under schedule pressure.
Pro Tip: Assign a specific person on site the role of weather monitor. They check the forecast each morning and flag any events that require a pre-shift inspection before excavation continues.
Reviewing site safety best practices from a land development perspective can help you build these monitoring habits into your project management system, not just your on-site procedures.
Site cut safety: What most guides miss
Most safety guides cover the rules well. What they rarely talk about is the cultural and commercial pressure that erodes those rules on real Auckland sites. The decision to skip a geotechnical report or delay a competent person inspection almost never happens because someone doesn’t know the rule. It happens because the programme is tight, the client is pushing, and the risk feels abstract until it isn’t.
Auckland’s pace of development, combined with its genuinely difficult soils and unpredictable rainfall, creates a specific kind of risk environment. Understanding the earthworks workflow reality on local projects makes it clear: the projects that avoid costly incidents are the ones where safety steps are built into the programme as fixed, non-negotiable milestones rather than tasks that get value-engineered out when things get busy.
Expert help for safe and compliant Auckland site cuts
If you’re looking for certainty and compliance in your next site cut, here’s how Bromley Group can support you.
[
Bromley Group’s team of Auckland earthworks contractors brings the assessment discipline, equipment, and regulatory knowledge to deliver site cuts that meet compliance requirements without unnecessary delays. From initial ground assessment through to final batter formation, we manage the safety process so your project stays on track. If you’re planning a site cut and want a team that treats safety as a programme milestone rather than an afterthought, book a site cut assessment with Bromley Group today.
Frequently asked questions
What is the biggest safety risk during a site cut?
The main safety risks are ground collapse and striking unknown utilities, both of which can cause serious injury or costly project delays. Geotechnical assessments and utility location are the two steps that directly address these risks before work begins.
When is shoring or shielding required in a site cut?
Shoring, shielding or benching is required for any excavation deeper than 1.2 metres under New Zealand health and safety regulations. The right protection method depends on soil type, site access and proximity to existing structures.
How often should site cuts be inspected during construction?
A competent person should inspect site cuts every day and immediately after any significant weather event. Post-rain inspections are particularly important in Auckland given the frequency of heavy rainfall throughout the year.
Who is responsible for calling before a site cut begins?
The contractor managing the excavation is responsible for contacting Dial Before You Dig and confirming all utility records before work starts. Responsibility for utility location cannot be delegated to a subcontractor without clear written confirmation of who has completed the check.
Recommended